Torch end of cut leadout and tuning
End of Cut Tuning (reducing gouge)
There are several reasons you may see a gouge at the end of a cut.
The Cause
Gouging typically occurs when:
The torch returns to the a location already cut-typically the start location-and does not shut off
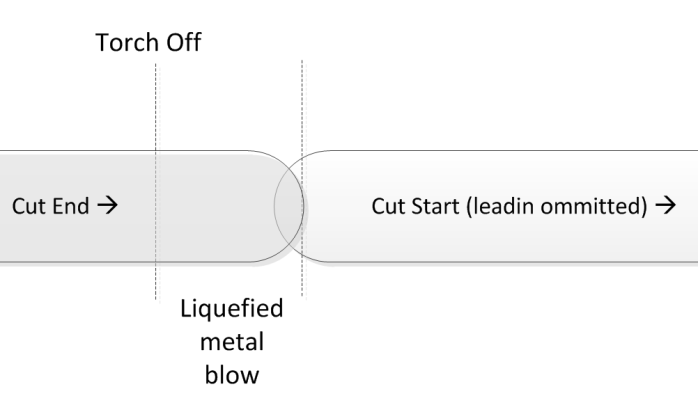
The torch returns to a location already cut and has been instructed to shut off (and does), but there is still a pool of liquefied metal around the torch, and the remaining (or ongoing) air pressure in the torch nozzle blows out the additional metal
This issue usually occurs on cuts where the part is between the torch and the ground, which means the first cut on a part and all holes.
It does not typically occur on the last cut where the part falls off because the torch is grounding into the remaining pipe (and thus arcing that direction).
However, depending on the tuning issue, gouging can occur on both ends.
 Solutions Overview
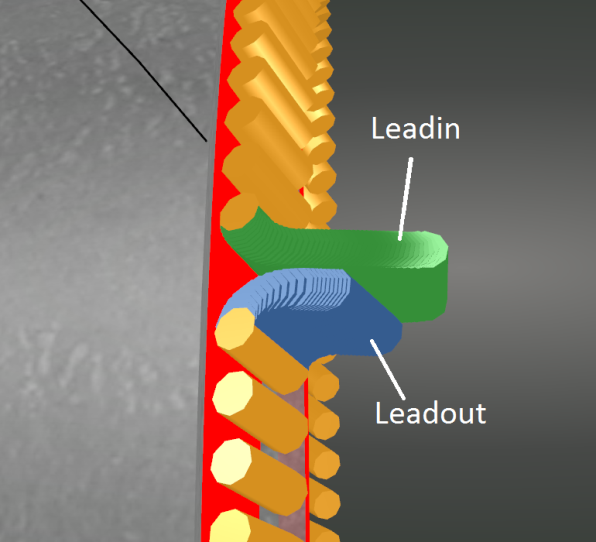
Use Leadout
Instruct the machine to perform a Leadout before the torch reaches the end of the part. This picture is showing a Leadout that is probably a little too early. Tuning this will be covered farther down.
 Turn Torch Off Early
Instruct the machine to turn off before it gets to the end of the cut. This accounts for not only how long it takes to turn the torch off, but also how long it takes for the torch to stop blowing liquefied metal off the part.
Use both Leadout and Turn the torch off early
This can be useful as you want the torch to move away, but if you can turn the torch off and have it moving away, only blowing liquefied metal, but not arcing (and
reaching toward the part, and creating more liquefied metal) then that can produce and even better result.
Here is what that looks like in PypeServer. (Again the Leadout for this is probably too far back.)
Parameters to adjust in PypeServer
Note that because of the dynamic nature of plasma cutting, operators may need to adjust these for differing conditions. See Factors That Affect Gouging.
Leadout
Check this to include a Leadout when the cut is using a Leadin.
Leadout Start Distance
This is the distance back from the end of the cut where the Leadout will begin its arc off the part. The arc radius is automatically calculated and is typically about the Kerf diameter.
Early Off Distance
Provides a fixed distance from the end of the cut at which the torch will be signaled to turn off.
Torch off lag time
Torch off lag time is used to calculate a distance based on the given Feedrate.
Using Leadout and Leadout Start Distance
This is by far the easiest and most consistent solution to not gouging parts. Used alone it will leave a small ridge where the start and end cut were exiting the cut line.
Here are a couple examples of a well-tuned Leadin and Leadout.
Try starting with a Leadout Start Distance that is about 2X Kerf Diameter and go from there.
You can try to get the Leadin and Leadout even closer, but the plasma arc will likely begin to reach somewhere into the part as the end-of-cut torch beam enters into the start-of-cut gap.
Calculating Early Off Distance
Early Off Distance defines a fixed distance the torch will be signaled to turn off before the end of the cut.
NOTE: This distance is independent of the Leadout Start Distance, meaning that the torch will turn off the distance from the actual end of the cut (not factoring in the Leadout path location or distance).
Here is one way to calculate an early off distance.
Turn off Leadout. Leadin is good because measuring a pierce hole is difficult.
Set the Early Off Distance to one inch,
Cut a straight cut around the pipe
Measure the distance not cut between the start of the cut and then end of the cut. You'll need to guess a little because of the Leadin arc. The closest edge of the leadin will be most accurate.
Set the Early Off Distance as 1" + (0.75 * Kerf) - the measured distance
The math: With numbers: (1 + (0.75 * .1) )- 0.6 = .475
Torch off lag time
Torch off lag time calculates an early off distance by Lag Time * Feedrate. The higher the feed rate, the longer the early off distance.
For example, a lag time of one second (1000 milliseconds entered in PypeServer), and a feed rate of 60 inches per minute, would result in an early off distance of one inch.
(60 inches per minute/60 seconds = 1"/ second, so a 1 second lag time = 1 inch.)
Torch Off Lag Time can be useful where you have cuts with different Feedrates (like end-cuts and holes), and your primary issue is the pressurized air lag time (continued blow of liquefied metal). The Torch off distance will adjust between faster and slower cuts.
Note:
At higher Feedrates, the size/length of the liquefied metal can be a limiting factor on this lag-time method. The pool of metal may not extend as far as the calculated lag time. In such cases, it is likely better to use early off distance.
Using Both Parameters
When using both early torch-off timing parameters, the system will take the greater of the two off distances. It will not sum the two.
You can see the torch off distances (if long enough) on cuts as gray (torch off) markers. (You may not always see these, as the markers on screen are a subset of the actual steps sent to the machine.)
Example:
Early Off Dist = .5, Torch Off Lag Time = 750 (milliseconds)
Feed Rate = 20: torch off dist = .5 Feed Rate = 60: torch off dist = .750
Factors that affect gouging
How long a torch blows liquefied metal off the part is governed by a number of parameters.
Air pressure and air volume between air valve and torch
Affects how long the torch will blow.
Time it takes for the air valve to actually close. ?
Seems to vary from torch to torch. ?Maybe how the solenoid is designed? ?
Feed rate
How fast you are travelling through the liquefied pool of metal is huge.
Deteriorating or changing to different consumables
Change in feed gas
Amperage and Ground quality
how much metal are you liquefying around the torch
how much reach your torch will have
Pipe thickness, Pipe size/mass and number of local cuts made to pipe
Affects how hot the pipe gets, which changes how much metal liquifies around the torch
Kerf and plasma beam shape
Affects heat and liquefied metal pool size
The time it takes for the torch to turn off?
Varies from torch to torch, bit I don't think I've seen a significant difference. ?
As these factors change (very dynamically), so will gouging. Because these parameters often vary, You may need to change the end cut tuning parameters with different cutting situations. ?
Example of different feed rates (back side of the cuts)
Different feedrates with all other settings the same. Note that results might notably vary if the cuts were slow to fast or fast to slow, as the metal would significantly change temperature with successive cuts.
Related Articles
Machine Tuning -- Troubleshooting
Machine Tuning -- Troubleshooting Parts are not cutting to design measurements-Troubleshooting This short document advises you on how to troubleshoot and tune your machine so that it cuts true to the dimensions in PypeServer. PypeServer does not make ...Enterprise Training - Machine Operation
Make a single cut on the pipe Trim the pipe with a single Miter cut. Click a button when you need to make a single straight or miter endcut on the pipe. v2.16 13 Beam Divergence Beam Divergence defined and how to set What beam divergence is and how ...Locating the Far End of the Pipe when using Pipe Far End
Locating the Far End of the Pipe when using Pipe Far End Locating the Far End of the Pipe When Using Pipe Far End This document presents features specifically for using the far end of the pipe with "roller-bed" type machines that do not have a chuck, ...Make a single cut on the pipe
Make a single cut on the pipe Trim the end of a pipe/Cut a pipe in half This function allows you to easily send a single straight or miter cut to the machine to make one cut (not cutting a two ended part). This functionality only appears when you are ...Load With Last Cut in the Chuck
Load With Last Cut in the Chuck Load with last cut in the chuck If you have a pipe with a pre-cut, straight end-cut (typically with a ground bevel), you can put that end in the chuck and use that as the last cut of your last part. This also works for ...